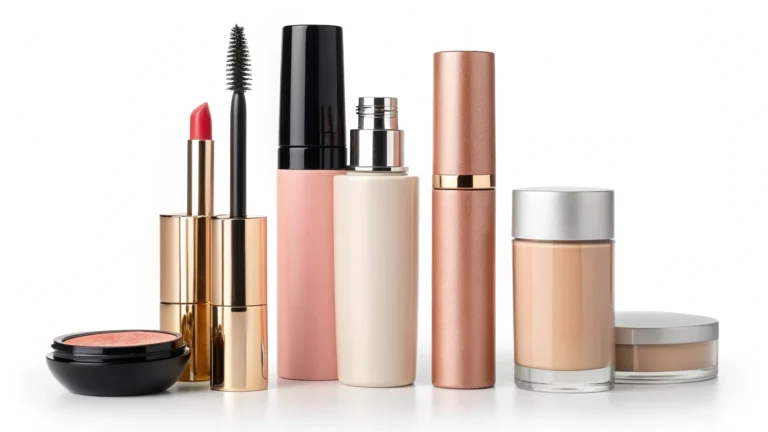
Your product is amazing, but the packaging feels cheap. This disconnect loses customers. I'll show you how to design packaging that sells and avoids costly production mistakes.
To master custom cosmetic packaging1, you must align your design with production realities2 early. This means choosing the right materials, creating clear specifications, and communicating effectively with your factory. This guide breaks down every step to ensure a smooth, successful process from start to finish.

I've seen so many brands struggle with this. They have a great product but stumble when it comes to the box it comes in. It's more than just a container; it's your first impression. Let's break down why it's so critical to get this right. Getting this part right sets the foundation for your entire brand experience.
Why do cosmetic packaging boxes matter more than you think?
You think packaging is just a box. But customers judge your product's quality by its cover. I'll show you how packaging can make or break your brand's success.
Cosmetic packaging is your silent salesperson. It communicates your brand's value, protects the product, and creates a memorable unboxing experience3. Getting it right builds trust and encourages repeat purchases, making it a critical investment, not just an expense.

I remember a client who sold a fantastic organic face serum. But it came in a flimsy, generic box. Sales were flat. We redesigned the packaging with a thicker, textured paperboard and a simple, elegant foil stamp. Almost overnight, their online reviews started mentioning the "beautiful box," and their sales increased by 30% in three months. The product didn't change, but its perceived value did. That's the power of packaging.
It's Your First Impression
Your packaging is the first physical interaction a customer has with your brand. On a crowded shelf or in a busy online store, it has seconds to grab attention. A well-designed box makes your product look professional and desirable. A poor one can make even the best product seem cheap or untrustworthy. It sets the stage for everything that follows.
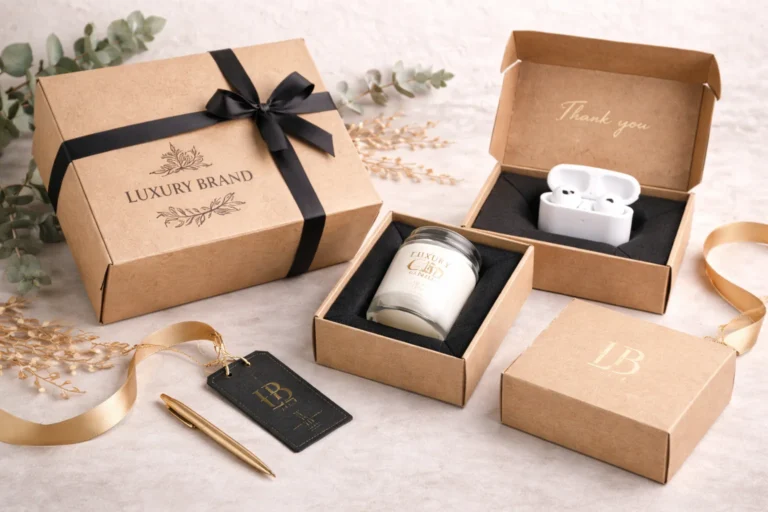
It Communicates Brand Value
Your box tells a story. Is your brand luxurious, eco-friendly, minimalist, or playful? The materials, colors, and design choices all send signals. A thick, rigid box with a magnetic closure says "luxury." A simple Kraft paper box with soy-based ink says "natural and sustainable." Make sure your packaging's story matches your brand's identity.
| Aspect | Poor Packaging | Great Packaging |
|---|---|---|
| First Impression | Ignored, looks cheap | Eye-catching, looks premium |
| Brand Message | Confusing or generic | Clear and consistent |
| Product Protection | Product may arrive damaged | Product is secure |
| Customer Feeling | Disappointment | Excitement, delight |
How do you create custom cosmetic packaging1 boxes step-by-step?
Starting a custom box design feels overwhelming. You don't know where to begin. This simple, step-by-step guide walks you through the entire process, from idea to reality.
Start by defining your brand and budget. Then, create a dieline4 (the flat template). Next, design your artwork on the dieline4. After that, choose materials and finishes. Finally, get a sample made before starting mass production with your factory.

This process seems linear, but the best results come from thinking about all the steps at once. For example, your design idea might not work with your chosen material, or it might be too expensive to produce. I always advise my clients to talk to a packaging supplier5 early. They can tell you if your dream design is actually possible within your budget. This simple conversation can save you weeks of redesigns and a lot of frustration.
Phase 1: Planning and Dieline
Before you design anything, you need a plan. Measure your product (bottle, jar, etc.) precisely. Decide on the type of box you want. Then, you or your supplier will create a dieline4. This is the flat, 2D outline of your box before it’s folded. It includes all the cut lines and fold lines. Getting the dieline4 right is critical. A mistake here means the box won't fit your product.
Phase 2: Design and Artwork
With the dieline4 as your canvas, you can now add your branding. This includes your logo, colors, text, and any other graphics. Use professional design software like Adobe Illustrator. Make sure you extend your design past the cut lines (this is called a "bleed") to avoid white edges after cutting. Also, keep important text and logos away from the folds and edges, inside the "safe zone."
Phase 3: Sampling and Production
Never, ever skip the sample. A digital proof looks different from a physical box. A physical sample lets you test everything: the fit, the colors, the material feel, and the overall quality. Once you approve the sample, your factory can begin mass production. I had a client skip the sample to save time, and 5,000 boxes arrived with the text slightly misaligned on the fold. It was a costly lesson.
What are the main types of cosmetic packaging boxes and when should you use each?
You see all kinds of boxes but don't know the difference. Choosing the wrong type can be costly or look unprofessional. I'll explain the common types and their uses.
The most common types are folding cartons (for most items), rigid boxes6 (for luxury gifts), and mailer boxes7 (for shipping). Choose folding cartons for flexibility and cost-effectiveness. Use rigid boxes6 for a premium feel. Select mailer boxes7 for durable e-commerce shipping.

The right box type depends entirely on your product, brand, and customer. A simple lipstick doesn't need a heavy rigid box, and a fragile glass bottle of foundation shouldn't be sold in a thin folding carton without extra protection. Think about the unboxing experience3. Do you want something that pops open easily or something that feels substantial and gift-like? The structure of the box is just as important as the graphics printed on it.
Folding Cartons: The All-Rounder
These are the most common boxes you see. They are made from paperboard that is printed, cut, and then shipped flat to you. You then fold them into shape. They are cost-effective, versatile, and great for items like lipstick, eyeshadow palettes, and smaller skincare tubes.
Rigid Boxes: The Premium Choice
Also known as set-up boxes, these are made from thick, condensed paperboard and come pre-assembled. They don't collapse. Think of the box your iPhone comes in. They are heavy, durable, and feel very luxurious. Use them for high-end gift sets, expensive perfumes, or luxury skincare lines to create a high-value impression.
Corrugated Mailers: The E-commerce Hero
If you sell online, these are your best friend. They are made of corrugated cardboard, which has a wavy layer of paper (fluting) sandwiched between two outer layers. This construction provides excellent protection during shipping. You can print directly on them to create a branded unboxing experience3 right from the mailbox.
| Box Type | Best For | Cost | Perceived Value |
|---|---|---|---|
| Folding Carton | Individual products, retail | Low | Medium |
| Rigid Box | Luxury items, gift sets | High | High |
| Mailer Box | E-commerce shipping | Medium | Medium-High |
How do you choose the right materials for your packaging?
The world of paper and cardstock is confusing. Choosing the wrong material can make your box feel cheap or fail to protect your product. I'll simplify the main options.
For most cosmetic boxes, choose paperboard like SBS (Solid Bleached Sulfate) for its clean, white surface, ideal for printing. For a natural look, use Kraft paper. For shipping, corrugated cardboard is essential. Your choice depends on your budget, brand aesthetic, and protection needs.

When I first started, I thought paper was just paper. I quickly learned that the material is the soul of the box. It affects the print quality, the sturdiness, and how customers perceive your brand. A supplier once sent me samples of the same design on three different paper stocks. The difference was incredible. One felt flimsy, one looked dull, and one was perfect—it felt sturdy and the colors popped. That's why choosing the right material is a decision you must make with care.
Understanding Paperboard Thickness
Thickness is measured in points (pt) or grams per square meter (GSM). A higher number means a thicker, sturdier board. For a small, lightweight item like a lip balm, a 14pt stock might be fine. For a heavier glass jar of cream, you might need 18pt or 24pt stock to feel secure and substantial. Ask your supplier for recommendations based on your product's weight and size.
Common Material Types
- SBS (Solid Bleached Sulfate): The most popular choice for cosmetics. It's a premium paperboard that is white on both sides, providing a bright, clean surface for high-quality printing.
- Kraft Paper: This is an unbleached paper that has a natural, brown look. It's strong and has a rustic, eco-friendly vibe. It's great for brands with a natural or organic focus.
- Corrugated Cardboard: This isn't for the primary product box but for the shipping box. Its layered construction provides cushioning and strength to survive the journey to the customer.
Sustainability Considerations
Many customers now prefer sustainable packaging. You can choose materials with high recycled content or paper that is FSC (Forest Stewardship Council) certified. This means it comes from responsibly managed forests. Using these materials and adding the logos to your box can be a powerful marketing tool.
Can you explain printing and finishing options8 in a simple way?
Terms like "debossing" and "spot UV" sound complex. You want your box to look special but don't know what to ask for. I'll break down the most popular options.
Printing methods are mainly offset (for high quality and large runs) and digital (for small runs). Finishes add texture and visual appeal. Popular choices include lamination (matte/gloss), spot UV (shiny areas), embossing (raised design), and foil stamping (metallic look).

Finishes are like the jewelry for your box. They can take a simple design and make it look incredibly sophisticated. But my advice is always to use them with purpose. Don't just add every finish you can think of. A simple box with one well-placed foil stamp can look more elegant than a box with five different finishes competing for attention. Less is often more. The goal is to highlight your brand, not to show off printing techniques.
Printing Methods: Offset vs. Digital
| Method | Best For | Quality | Cost |
|---|---|---|---|
| Offset Printing | Large quantities (1000+) | Highest quality, best color accuracy | Low per-unit cost at high volume |
| Digital Printing | Small quantities, prototypes | Good quality, fast setup | Cost-effective for low volume |
Common Finishing Touches
- Lamination: A thin plastic film applied to the box. Matte lamination gives a soft, modern look and reduces glare. Gloss lamination makes colors pop and adds a shiny, durable finish.
- Foil Stamping: Applying a metallic or pigmented foil to the surface using heat and pressure. It's perfect for logos and text to add a touch of luxury. Gold, silver, and rose gold are popular.
- Embossing / Debossing: Embossing creates a raised, 3D effect on the paper. Debossing creates a sunken-in impression. Both add a tactile element that feels very premium.
- Spot UV: Applying a high-gloss varnish to a specific area ("spot") of the box. It creates a contrast between matte and shiny surfaces, great for making a logo or pattern stand out.
What are the biggest mistakes brands make with packaging and how can you avoid them?
You've invested time and money, but your packaging project is a disaster. Common mistakes can derail everything. I'll show you the pitfalls and how to steer clear.
The biggest mistakes are unclear specifications, skipping the physical sample, over-complicating the design, and ignoring shipping durability. Avoid these by creating a detailed spec sheet, always approving a sample, keeping the design practical, and testing your packaged product by shipping it.

From my experience working with factories, the smoothest projects are always the best planned. The problems almost always come from a brand being unprepared. They send a low-resolution logo, they don't know what material they want, or they try to make a change after we've already ordered the paper. A simple, well-planned box will always beat a complex, rushed one. Get the basics right first.
The Vague Specification Trap
A factory can't read your mind. If you just say "a blue box for my cream," you will get a surprise. You need to be specific. A good spec sheet is your blueprint for success. It eliminates guesswork and ensures you and your supplier are on the same page from day one.
Your Spec Sheet Checklist:
- Box Type: (e.g., Straight Tuck End Folding Carton)
- Dimensions: Length x Width x Height (in mm or inches)
- Material: (e.g., 18pt SBS C1S)
- Printing: (e.g., CMYK + 1 Pantone color)
- Finishes: (e.g., Matte Lamination, Gold Foil Stamping on logo)
- Quantity: (e.g., 5,000 units)
The "No Sample" Gamble
I'll say it again: always get a physical sample. It's your only chance to catch errors before you've paid for thousands of boxes. Test the fit with your product. Check the colors in natural light. Feel the material. Show it to people and get their feedback. The small cost and extra week it takes to get a sample can save you thousands of dollars and a huge headache.
Design That Can't Be Produced
Some designs look great on a screen but are a nightmare to produce. Tiny, delicate text with foil stamping can be hard to make cleanly. Dark, solid colors are prone to scuffing without lamination. A good supplier will warn you about these potential issues. Listen to their advice. They know what their machines can and can't do well.
How much do custom cosmetic packaging boxes really cost?
You need a budget but have no idea what packaging costs. Prices seem to be all over the place. I'll explain what drives the cost of your custom boxes.
Costs vary widely, from $0.20 to over $5.00 per box. The main factors are quantity (more is cheaper per unit), size, material complexity, printing methods, and special finishes. A simple, high-volume folding carton will be the cheapest option.

When a brand asks me "How much for a box?" it's like asking "How much for a car?" The answer is always, "It depends." A basic sedan is much cheaper than a luxury sports car. The same is true for boxes. The key is to understand what features you are paying for. You can then decide where to invest your money to get the best value for your brand. Maybe a better material is more important than an extra finish.
Key Cost Drivers
The price of your box is a combination of several factors. Understanding them helps you control your budget.
| Cost Factor | Impact on Price | Why? |
|---|---|---|
| Quantity | High | The more you order, the lower the price per box. Setup costs are spread over more units. |
| Size | High | Bigger boxes use more material, which is a primary cost. |
| Material | Medium-High | Rigid box materials are much more expensive than folding carton paperboard. |
| Finishes | Medium-High | Each special finish (foil, embossing, etc.) is an extra step that adds labor and material costs. |
| Printing Colors | Medium | Using custom Pantone colors or many colors can cost more than standard CMYK printing. |
How to Get an Accurate Quote
To get a price you can rely on, give your supplier all the details. Send them the spec sheet we talked about earlier. If you have your dieline and artwork ready, even better. The more information you provide, the more accurate your quote will be. Don't be afraid to ask for quotes on a few different quantities (e.g., 1000, 2500, and 5000 units) to see how the per-unit price changes.
How should you work with a packaging supplier or factory?
You found a factory, but communication is difficult. Misunderstandings can lead to costly errors. I'll give you a guide to building a great relationship with your supplier.
Treat your supplier like a partner. Provide clear, detailed specifications and artwork from the start. Ask for their expert opinion on production feasibility. Approve samples promptly and avoid last-minute changes after production has been planned. Clear communication is key.

I see this all the time. Brands treat their factory like a vending machine. They put in a request and expect a perfect product to come out. The best brands treat their supplier like a partner. They collaborate. I had a client who worked with the factory's advice to slightly change a fold on their box. It didn't affect the look, but it allowed the box to be glued by a machine instead of by hand, saving them $0.15 per box. That's a huge saving on an order of 20,000 units.
Preparing for First Contact
Before you even email a supplier, have your information organized. Know your box dimensions, your desired material (or ask for their recommendation), and have a rough idea of your design. Send them a complete spec sheet and your artwork files in the correct format (usually a vector PDF or Adobe Illustrator file). This shows them you are a professional and serious client.
The Sampling Process
Once you receive a sample, review it carefully and quickly. If it's perfect, approve it immediately so they can schedule production. If it needs changes, provide clear, consolidated feedback. Don't send five separate emails with small tweaks. Send one email with all the changes clearly listed and marked up on a photo of the sample if possible.
Managing Production and Timelines
Understand that custom packaging takes time. Ask for a production timeline upfront. Remember that things like Chinese New Year or other holidays can cause delays. The factory's biggest frustration is last-minute changes. Once they order paper and make printing plates, changing the design is extremely difficult and expensive. It disrupts their entire schedule. Finalize your design and approve your sample before you give the green light for production.
| Do's | Don'ts |
|---|---|
| Do provide a detailed spec sheet. | Don't send vague requests. |
| Do ask for their expert advice. | Don't ignore their production warnings. |
| Do approve samples quickly. | Don't make changes after production starts. |
| Do treat them like a partner. | Don't treat them like a vending machine. |
Conclusion
Mastering custom packaging is about smart planning. Align your design with production, communicate clearly with your factory, and you will create boxes that build your brand and your business.
Explore this resource to learn how to create effective and appealing packaging that enhances your brand. ↩
Understanding production realities can help you avoid costly mistakes and ensure your design is feasible. ↩
Explore how thoughtful packaging design can enhance the unboxing experience and customer satisfaction. ↩
Get insights into creating an effective dieline to ensure your packaging fits perfectly. ↩
Choosing the right supplier is key to successful packaging; find out what to look for. ↩
Rigid boxes can elevate your product's perceived value; learn why they are a great choice. ↩
Discover how mailer boxes can protect your products during shipping and enhance customer experience. ↩
Explore various finishing options that can add a premium touch to your packaging design. ↩